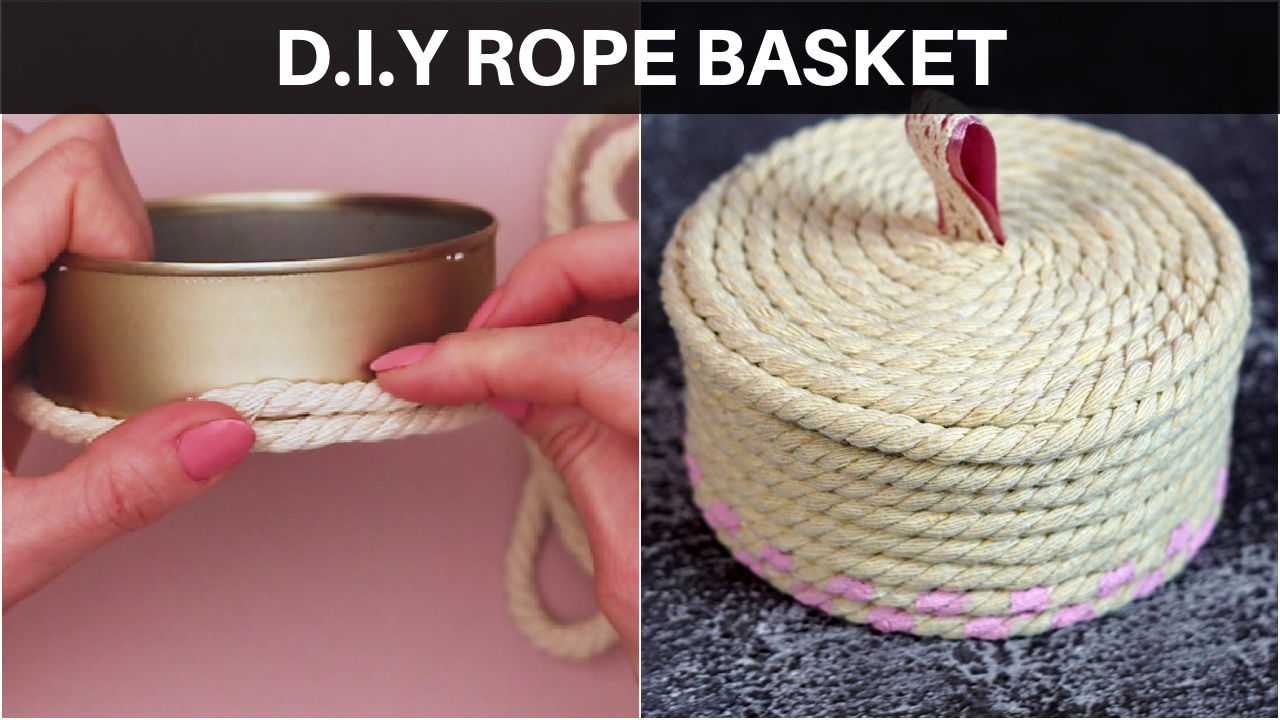
Rope baskets are versatile, go with many types of decor, and add texture to a design. Hand-crafted rope baskets are a beginner-friendly DIY, easy to make in a variety of sizes.

Today we’ll walk you through crafting a small rope basket, perfect for storing jewelry and other small trinkets.
Materials:
- hot glue gun
- scissors
- paintbrush
- pencil
- pink acrylic paint
- tin
- rope
- silk ribbon
- lace ribbon
- cardboard

Step-by-Step guide
Step 1: Cut out a cardboard circle
Place a piece of cardboard flat on your work surface, and then place the tin you’ll be using on top, face down. Trace around the tin with a pencil to create an outline. Then use the scissors to cut out the circle.
In a later step, you’ll use the cardboard circle to create a lid for your basket.


Step 2: Wrap and glue rope around the tin
Make sure the tin you’re using is clean. Remove any labels or glue if necessary, and ensure the edges are smooth and free of imperfections. Then apply a thin line of glue onto the tin starting at the bottom. Begin wrapping the rope around the tin, adding more glue as you go. Make sure the rope is tight, and follow the edge in a straight line.


Step 3: Cut the excess rope and secure the ends with glue
When you’ve covered the exterior of the tin with rope, cut off the excess and secure the end with hot glue. Blend the end with the rest of the rope so it doesn’t look out of place. You can flatten it and press it down as the glue dries or cut it at an angle to make the transition smoother.


Step 4: Glue some lace onto a piece of ribbon
The next step is to prepare a loop handle for your basket lid. Cut a piece of ribbon that’s twice as long as you want the loop to be. Next, cut a piece of lace ribbon the same size. Apply a thin line of hot glue and try to center the lace onto the ribbon. Gently press it with your fingers and allow it to dry.


Step 5: Glue the loop handle onto the cardboard
Fold your ribbon in half and apply a dollop of glue to the underside of the ribbon. Press the ribbon together to create the loop. There should still be excess ribbon on both sides of the spot you’ve glued.
Position the ribbon loop on the center of the cardboard. Use your hot glue gun to glue down the ends of the ribbon to the cardboard lid.


Step 6: Cover the cardboard lid with rope
Starting from the center, where the loop handle is, apply a bit of hot glue onto the cardboard and make a rope coil. Add more glue and secure the rope onto the cardboard lid until you’ve covered the entire circle. Wrap the rope around the edge of the cardboard at the end and cut off the excess rope.


Step 7: Paint the basket
Now it’s time to add the finishing touches to your rope basket. (This step is optional, and you can leave the basket as it is if you’d like.)
We chose pink acrylic paint that matches the little loop handle on the lid. If you want to add a design, use a paintbrush and acrylic paint to add a pattern to the basket.

Once the paint is dry, your rope basket is complete.


