A floor plan is a scaled diagram that represents a room or building as viewed from above. Floor plans provide a visual representation of the area size, the arrangement of rooms, and the location of doors and windows.

The floor plans may also include the layout of furniture and the texture of various architectural features in the room.
Certain professions, like architects, builders, real estate agents, and interior designers, use floor plans to help plan the space and as a visual representation for their clients.
Floor plans are useful in these spheres to help builders and clients make informed decisions that relate to the layout and flow of a space.
Floor Plan Elements
Certain elements are present in floor plans for different professions that are not present in all floor plans. Floor plans can include the following elements:
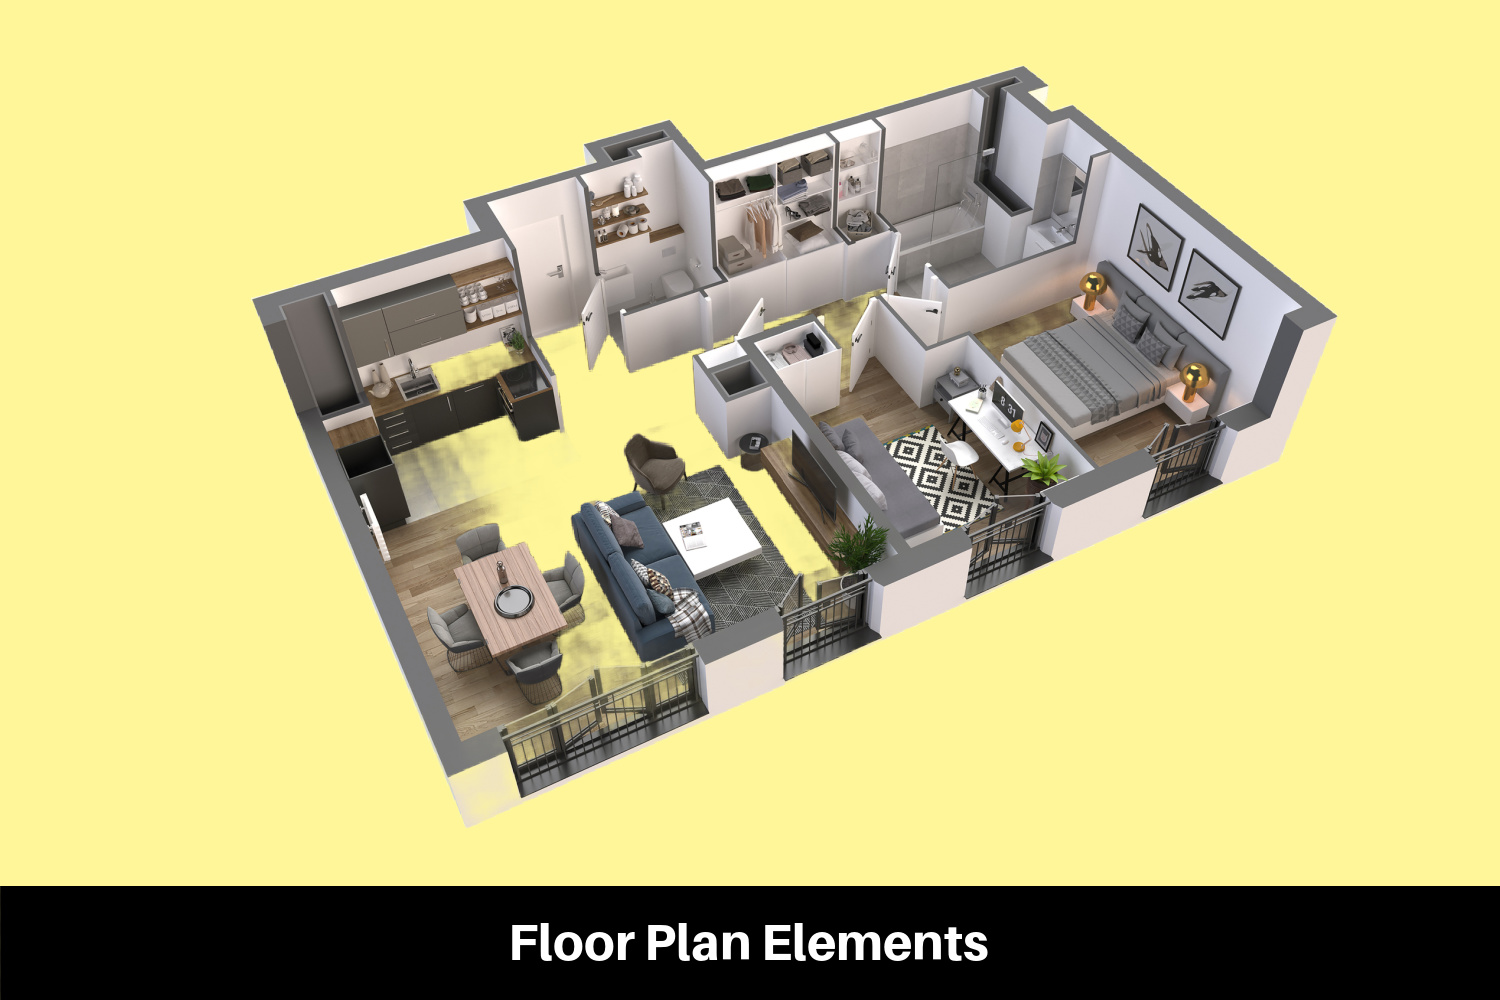
- Walls: Walls are frequently depicted on a floor plan as single or parallel lines. Exterior walls are typically represented with thicker lines than interior walls, which are represented with thin lines.
- Doors and windows: Doors create a break in the wall and show a curved line indicating which way the door will swing. Windows, which are represented as three parallel lines, create a break in the line of the wall.
- Room title: Titles for rooms indicate their purpose, such as “bedroom,” “kitchen,” and “dining room.”.
- Dimensions: Floor plans include measurements that show the length and width of walls, as well as the distance between other features.
- Furniture and fixtures: Certain floor plans, particularly those that interior designers and real estate agents use, include furniture and fixtures such as cabinets and appliances. These help with more accurate space planning.
- Staircases and circulation paths: Stairways are common in interior floor plans with multiple levels. Some also include circulation patterns in the form of arrows or shading to indicate high-traffic areas.
- Notations: Additional notes or labels may be present for specialized floor plans to convey specific information like surface materials, location of electrical outlets, plumbing, and landscaping.
Methods for Making a Floor Plan
Making a simple floor plan is possible for anyone with just a few tools and some practice. You can either make a floor plan by hand or use software or an interior design application to build a computer model. You can either draw a floor plan of a home or room that already exists or create a floor plan from scratch. Here are some alternate methods to create a simple floor plan:
Hand Drawing
Hand-drawn floor plans are useful when you are just trying to get a rough sketch of your space or if you are trying to brainstorm ideas from scratch.
- Use graph paper and an architect’s scale to draw out a floor plan of the space you want to represent. Using an architect’s scale, you can create an accurate but miniature version of the space, which traditionally has a scale of ¼ inch to represent 1 foot.
- Start by drawing the outer walls, windows, and doorways. Next, add the interior architectural features.
- Label the room according to purpose and mark the dimensions of the walls and important features.
Home Design Programs and Tools
Home design programs and tools help architects, interior designers, and real estate agents create home designs and floor plans that are sophisticated and beautiful. Many of these programs contain CAD components, but they have extra features like materials, textures, and colors that generate more complete floor plans.
- Online floor planner programs and tools can create both 2D and 3D floor plans that include material, textures, and furniture to help make the space more realistic.
- Consider home design programs in terms of price, sharability, and features they offer before you choose one that will work for you.
Mobile Apps
Mobile phone applications are a new way to create quick and easy floor plans.
- With mobile apps like MagicPlan, CubiCasa, and Room Scan, you can use your smartphone’s camera and sensors to create floor plans by scanning the room.
- These apps are quick and convenient for creating on-the-go floor plans, but they may lack the accuracy of computer-based home design programs.
Graphical Computer Programs
You can use graphic design software like Adobe Illustrator and Photoshop to create simple floor plans.
- These programs have flexible design parameters that allow you to create any design. Yet they may be difficult to master if you are not experienced with them.
Hire a Professional
Hiring a professional may be beneficial for complex floor plans or floor plans that you want to use with builders and other contractors.
- Consider hiring an architect, architectural drafter, CAD designer, builder, or interior designer, depending on the nature of the project.
- Professionals can design floor plans that are accurate, scalable, and detailed to meet your specific needs while adhering to building codes and regulations.
How to Make a Basic Floor Plan
Creating a floor plan entails a number of steps that must be followed to ensure that the design accurately reflects the space that you want to create.
- Gather Information
Take measurements of the rooms you want to include in your floor plan, or decide on the dimensions of the rooms if you are designing a floor plan for a new space. Take note of the location of the space’s doors and windows, or decide where you want to place them to create the best flow. Record the room heights, noting any changes in height throughout the space.
- Choose a Scale
Determine the scale of your floor plan. The most common scale is 1/4 inch to 1 foot, or 1:50. It is critical to select a scale that is appropriate for the type of project as well as the paper size or software that you are using.
- Select Your Tools
Decide what type of floor plan you want to create, either a hand-drawn or with digital software. Choose your other tools accordingly, such as graph paper, pencils, an architect’s scale for hand-drawn floor plans, or home design or CAD software for digital designs.
- Draw the Exterior Walls
Begin by sketching the space’s exterior walls to scale. To distinguish these lines from interior walls, make them thick or dark. Make the exterior walls as dimensionally accurate as possible to avoid issues when drawing the interior walls. Label the dimensions of each wall.
- Draw the Interior Walls
Draw the interior walls to represent the layout of the rooms and spaces within the structure. Use your measurements to determine the proper placement of the walls.
Interior walls should have thin and light lines to distinguish them from exterior walls.
- Add Doors and Windows
Place the doors and windows in their proper locations. Use a triple-line symbol to represent windows and a slanted and curved line to represent doors and the direction they open. After you have added the windows and doors, label the dimensions along the wall, including the full width and length as well as the measurements of the area of wall between the doors and windows.
- Label the Rooms
Label the rooms according to their function, such as bedroom, kitchen, living room, dining room, and so on.
- Add Fixtures and Furniture (Optional)
Some floor plans, particularly those used for space planning, incorporate fixtures and/or furniture. Create symbols to represent these components. If you want to be able to move the furniture around to determine the best placement, you can draw in the symbols of the non-movable elements and make miniature paper cut-outs for movable furniture.
- Measure and Verify
Double-check the measurements on your floor plan to verify their accuracy. Measure all the extra elements in the room, including door and window openings, and check that the measurements of all the parts equal the exterior dimensions of the wall.
- Add Notations
Add further notations or labels if you need to provide any extra information because of the way that you will use your floor plan. These extra notations may include the location of electrical outlets, material finishes, or other vital information.
- Review and Save
Consider your completed design. Make any additional changes necessary to create a clear representation of your space. Save the layout as a digital file if you used home design software. You can create a saved version of your hand-drawn layout by taking a picture and uploading it or by making copies of the drawing.
- Seek Feedback
Share the floor plan with anyone else who has an interest in the design, such as family members or clients. If your layout is complex and you want professional advice, it is beneficial to solicit feedback from professionals such as architects and builders. Allow them to contribute their ideas to help you improve your floor plan design.
- Make Changes and Finalize Your Design
Once you are satisfied with the design, finalize your floor plan by creating a clean and polished version for presentation.